DevOps
Docker for developer/devops
In this tutorial we will learn about the docker and it's important in oftware development
Docker is a platform that enables developers to easily build, deploy, and run applications using containers. Containers are lightweight, portable, and self-sufficient units that encapsulate all the dependencies and settings needed to run an application. Docker provides a consistent environment across different systems, making it easier to develop and deploy software.
Docker is an open-source platform that allows you to automate the deployment and management within lightweight,isolated software container.
Here's a brief overview of how Docker works:
-
Images: Docker uses images to create containers. An image is a lightweight, standalone, and executable package that includes everything needed to run a piece of software, including the code, runtime, libraries, and dependencies.
-
Containers: Containers are instances of Docker images. They run as isolated processes on the host operating system, sharing the kernel with other containers but with their own filesystem, CPU, memory, and network resources.
-
Docker Engine: Docker Engine is the core component of Docker. It's a client-server application with a daemon process (
dockerd) that runs on the host machine and a CLI (docker) that allows users to interact with the daemon.
Advantages of docker:
1.portability:
Docker container can run on any system,ensuring consistent behaviour across different environment.
2.Isolation:
Container provide isolation, preventing interference between applications and dependencies. like py2 ,py3 example
3.Efficiency:
Docker container are the light weight,start quickly,optimizing resource utilization.
4.Scalability:
Docker simplifies scaling by easily replicating and distributing containers.
5.Versioning and Rollback
Docker enables versioning and rollback of containrized applications.
6.Dependency management:
Docker packages app with their dependencies,avoiding conflicts.
7.collaborations:
Docker facilitates sharing and collaboration among developers and teams.
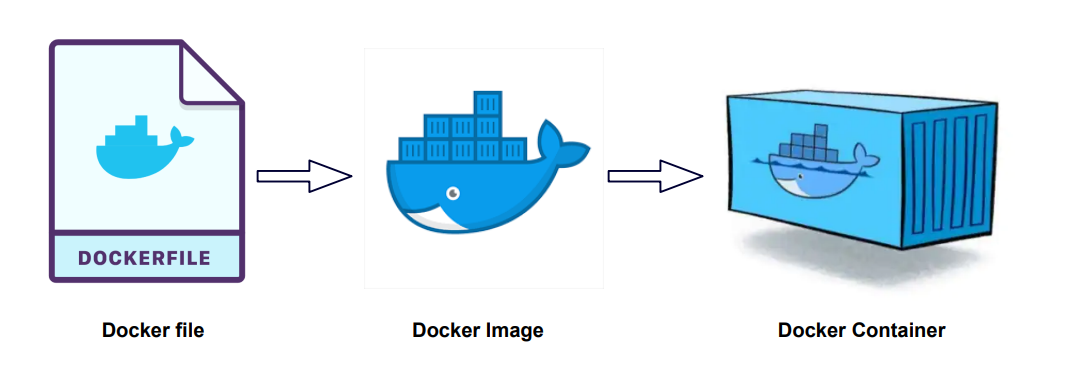
Dockerfile:
Docerfile is a text file that contains instructions on how to build a Docker Image (images like python,ubuntu,react )
it specifies the base image,the application code,dependencies and other configurations needed to create a runnable image
Docker Image:
An image is a lightweight, standalone and executable software package that includes every things needed to run an application, including the code,runtime,system tools,libraries and settings.
example: we package whatever we need to run project like django,mysql,python,postgres e.t.c
docker images are created from base image and can be customized and layered with additional components.
example python3
.....
django
Docker container
Container are isolated environments that encapsulate an application and it's dependencies, including libraries,framework and other software.
each container run as an isolated process on the host machine and has it own file system,networking and resources.
note: you can make multiple container from one docker image (dockerfile--docker image--c1,c2,c3)
Docker compose:
Docker compose is a tools for defining and managing multi-contains applications.
it allows you to define a multi-contains setup in YAML file,specifying the containers,their configurations and how they communicate with each other.
docker compose simplifies the process of running complex applications with multiple interconnected containers.
Container Registry:
It is a centeralized repository for storing and sharing container images. it allows you to manage and distribute containerized app,ensuring secure access,versioning and image integrity.
example:docker hub,
Amazon elastic container registry(ECR)
Google container registry(GCR)
Github container registry(GHCR)
Gitlap conatinr Registry
Azure Container registry
What is docker container registry:
A docker registry is a central repository that stores docker image. the most commonly used registry is docker hub,which is a public registry where you can find a wide range of pre-build docker images.
What is base image:
A base image refer to the initial starting point for building a docker image.
it serve as a foundation or template on which you can add or customize additional layers to create your specific application images.
a bse imae is typically a pre-build and reusable image that contains a specific software stack.
it provides necessary runtime environment and libraries for runnung application with in docker containers.
example: you might needed base image that include light weight linux didtribution sucha s alpine linux or ubuntu as foundation fro your application.
regularly updating your base image and applying security patvhes is also recommended to ensure theoverall security of your containerized appliaction.
so at first you make dockerfile then from that dockerfile youmake docker image (or you can pull the docker images as well) and from that docker image you build the container(you can make multiple container from the docker image)
howto downlaod and setup docker on your device
Visit docker.com , click on developer tap , then go to documentation link and click on Get Docker
You will be redirect in https://docs.docker.com/get-docker/ where you need to choose the os as your's requirements
In this we will choose ubuntu as operating system:
Then you need to choose linux distribution as per your requirements as ubuntu,debian,red hat enterprise linux(RHEL),fedora
here i choose ubuntu then click on DEB package , which will download .
Follow below step :
1.Set up Docker's package repository as
# Add Docker's official GPG key:
sudo apt-get update
sudo apt-get install ca-certificates curl
sudo install -m 0755 -d /etc/apt/keyrings
sudo curl -fsSL https://download.docker.com/linux/ubuntu/gpg -o /etc/apt/keyrings/docker.asc
sudo chmod a+r /etc/apt/keyrings/docker.asc

# Add the repository to Apt sources:
echo \
  "deb [arch=$(dpkg --print-architecture) signed-by=/etc/apt/keyrings/docker.asc] https://download.docker.com/linux/ubuntu \
  $(. /etc/os-release && echo "$VERSION_CODENAME") stable" | \
  sudo tee /etc/apt/sources.list.d/docker.list > /dev/null
sudo apt-get update
2.Download DEB package (which we have already downloaded)
3.Install the package with apt as follows:
move to the directory where you have install DEB package and then hit below command
sudo apt-get update
sudo apt-get install ./docker-desktop-<version>-<arch>.deb

# example
sudo apt-get install ./docker-desktop-4.29.0-amd64.deb
4.Lunch Docker Desktop
systemctl --user start docker-desktop
5.Verify Docker
docker compose version
docker --version
docker version


# other docker command

which docker  #If Docker is installed, this command will show you the path to the Docker binary

docker system info
docker info
docker ps
docker ps -a
docker rm container_id
docker rm -f container_id
docker images
docker rmi image_id
docker network ls
docker network rm network_id
docker volume ls
docker volume rm volume_id

docker stop container_name
docker start container_name
docker restart container_name


docker rm container_name (to delete container)
docker rmi image_name (to delete image)

docker inspect container_id
docker image inspect image_name/image_id
docker logs container_name/container_id

docker system prune # to remove all unused container,network,volumes and other stuff
docker volume prune # to remove all unused volumes
docker container prune # to remove all stop container

#you can run a simple command like sleep infinity to keep the container running indefinitely
docker run --name container_name -d python:3.9-bullseye sleep infinity
Images can be pull or can create
docker pull [OPTIONS] NAME [:TAG|@DIGEST]
# note OPTIONS can be -all-tags,-a and many more
docker pull python
docker pull python:3.9-slim
docker pull python:3.13.0b1-slim-bullseye

docker pull mysql:latest
docker pull nginx:1.25.5  # it will pull images layer by layer
docker pull ubuntu:20.04
Run docker image on container
docker pull hello-world:latest # to pull image
docker run --name hello_container(name_of_container) hello-world:latest(image_name or image_id)

docker run hello-world:latest # this command will full the image and run container as well

docker run --name python_conatiner python:3.9-slim(tags) # to run python image

to run in backgound
docker run --name container_name -d python:3.9-slim(image_name)

note: here -d means to run in detached mode or to run in background and return container id


docker run --name container_name -i -t -d python:3.9-slim(image_name)

here: -i means open interactive mode(allow user for input) and -t means it provide interactive terminal interface

docker run --name container_name -i -t -it -d python:3.9-slim(image_name)
here: -it means it make session, it doesnot make exit

docker run --name container_name -it python:3.9-slim # without run on bg it provide terminal instantly

docker run --name contianer_name -it --rm python:3.9-slim
used this container and after used/exit remove it


docker exec # to execute command in running container

docker exec -it name_of_container python
note: what to write in place of python for that
docker inspect container_name, then "cmd":["python3"]
docker environment variable
# make container with mysql and run it on background
docker run --name mysql_container -e MYSQL_ROOT_PASSWORD=abc -d mysql:8.0-bullseye
#here -e is used for environment variable

# to execute mysql_container which we have make
docker exec -it mysql_container mysql -u root -p

example:
docker exec -it(interactive terminal) container_name not_container_name_it_is_from_inspect_container


expose port
docker run --name nginx_container -d -p 8080:80 nginx:1.25.5

note: here 8080 is port of host system (local system), if you hit 8080 port on host machine you will get nginx 80 port

similary you can aslo do for apache serevr as well
search apache in docker hub for pulling image, you will see httpd , then you can pull image as

docker pull httpd:alpine
dokcer run --name apache_container -d -p 8000:80 httpd:alpine
Till Now we pull images and make container according to requirements, now we are going to learn how to make image and used it accordingly to our container for that follow below steps
1.make one directory
2.create Dokcerfile inside it as
#use ubuntu as base image
FROM ubuntu:20.04
#set working directory inside container
WORKDIR /app
#copy script file to conatiner
COPY script.sh .
# it will cpoy script.sh file inside the  container's app directory

# make script executable
RUN chmod +x script.sh

# run script when container start
CMD ["./script.sh"]
3.create script.sh file in same directory as
echo "Hello Docker"
4.Open terminal inside the directory where Dockerfile is exist and run below commad
#make docker image
docker build -t image_name .
# it will build image in name mention above in current directory, you can also provide tag of the image if not latest is taken automatically
docker build -t image_name:1.0.0 .
docker build --no-cache -t image_name .

note: image name must be unique otherwise it will make old to <none> "name"
      if you make changes on image , you need to make new build as well

then if you hit docker images , you will see your newly created image
then you can run this image on container as

docker run image_name

if you want to provide name of container you can also do that like

docker run --name container_name image_name
.dockerignore file
Not sent to build and not sent to container as well.
example: .dockerignore .env
How to host build image to docker hub
1.create docker hub account
2.move to the repositories to push image
3.>>docker tag image_id docker_hub_username/name_of_repo_you_want_to_give
4.>>docker login
username
password
5.now you login to your dockerhub , now push image
>> docker push username/nam_of_repo_you_want_to_give
Docker Volume (share project data between)
Docker volume is a feature provided by Docker that allows you to manage persistent data in docker container.
when docker container is created and started, it generally runs in an isolated environment with its own file system. however,any data stored within the container is typically non-persistent meaning it will be lost when the container is stopped or removed.
Docker volume provide a way to overcomes this limitation by allowing you to create a separate storage are that can be shared between containers or between a conatianer and host system.
volume provide mechanism for storing and managing data separately from the conatinaer itself,ensuring that the data persists even if the container is stopped or deleted.
Docker volume:
Docker volume is essentially a directory or a mount point located outside the container's file system,which is mapped to a specific path within the container.
This mapping enables the conatianer to read from or write to the volumes as if it were a regular directory with in the container.
Docker volume is not created inside the container. instead a docker volume is created separately from the containar and can be mounted to one or more container. it is independent and can be associated with one or more container.
Advantages of Docker volume:
1.Volumes are easier to backup or migrate than bind mounts.
2.you can manage dokcer volume using Docker CLI commands or the Docker API
3.Volumes works on both Linux and windows containers.
4.Volumes can be more safely shared amomg multipl conatianer.
5.Volume drivers let you store volumes on remote hosts or cloud providers,to encrypt the contents of volumes, or to add other functionality.
6.New volume can have their content pre-populated by a containers.
7.Volumes on docker Desktop have mush higer performance thean bind mounts from Mac and windows hosts.
command related to docker volumes
docker volume create volume_name
docker volume ls
docker volume inspect volume_name
docker volume rm volume_name
docker volume prune # remove all volumes that are not connected to container

docker run -d --name nginx_container -v test_volume:/app nginx:1.25.5
#it is used to start a container and create a volume if volume doesnot exists.
# it is mapped as /app


docker run -d --name nginx_container -v test_volume:/app:ro nginx:1.25.5
#it is used to start a container and create a  read only volume if volume doesnot exists.
# it is mapped as /app
Between host and container
we can share data between host nad container without creating docker volume by directly mounting host directory to container directory.
example:
1.make a directory as mysite and make python file as app.py then write python code or you can make entire project as well
2.we need to mount this folder
docker run --name python_container -itd -v /home/user/0.amrit/learn/mysite:/myapp python:3.9-bullseye
 # then myapp folder will  be generated inside the container

docker ps -a
dokcer exec -it python_container bash
ls
cd myapp
python app.py
Project is in host machine but it is running on dokcer. All the changes are dynamically reflected in docker as well.
Between containers
To share a volume between two conatiners , you can create a docker volume and then mount it to both conatiners.
All data is in volume, which is shared among the containers.
Volume (data is in volume)
| |
| |
conatiner 1 conatianer 2
1.create volume then mount to conatiners
docker volume create myvol
docker run --name container_1  -itd -v myvol:/myapp1 python:3.9-bullseye
docker run --name container_2  -itd -v myvol:/myapp2 python:3.9-bullseye

# here myapp1 and myapp2 are the path to mount


or you can create container with volumes as well

docker run --name container_1 -itd -v /myvol(volume_name):/data python:3.9-bullseye(image_name)
docker run --name container_1 -itd -v /myvol(volume_name):/data python:3.9-bullseye(image_name) /bin/bash (to run container continue)


# to share volume
docker run --name container_2 -itd -v --volume-from container_1 python:3.9-bullseye(image_name)


# now you can two container share same volume

docker exec -it container_1 bash
ls-- myapp1
cd myapp1

touch app.py


docker exec -it container_1 bash
ls-- myapp1
cd myapp1
ls
# there you will see app.py file which is creat on conatiner_1 so data is shared between conatiner
# if you see docker inspect container_name you will see on mount ........


# note it you delete container volume will be deleted
Volume with Dockerfile
FROM ubuntu:latest
VOLUME ["/data"]
This line Volume/data in the dockerfile is an instruction that tells docker to create a mount point for a volume inside the containers it specifies that the directory/data should be treated as volume.[it is only directory/path which work as a mount point inside container]
it means that any data written to or read from the /data directory within the containaers will bes tored outside the container in a volume.
Note: the volume instruction in dockerfile doesnot create the volume itself. it merely setup the mount point within the container. The actual volume created when you run the container and specify a volume name or path using the -v flag.
Docker Network
Docker Network is a fundamental aspect of docker that enables communication between Docker containers and external networks.
it allows you to connect containers togethers, as well as connect containers to the host machine and other external resources.
A container has no information about what kind of network it's attached to or whether theirs peers are also Docker workloads or not.
A container only see a network interface with an IP address,a gateway,a routing,DNS services,and other networking details.
By default when you create or run a container using docker create or docker run , the container doesnot expose any of it's ports to the outside world.
use the --publsh or -p flag to make a port available to services outside of docker. this creates a firewall rule in the host,mapping a container port to a port on the docker host to the outside world.
Network drivers:
.bridge
.host
.overlay
.macvlan
.ipvlan
.none
Bridge network drivers
Host(it is host which has : ip,mac,dokcer,w11)
|
Bridge_default ( )
| |
| |
conatiner 1 conatianer 2
Container can communicated with each other
container and host can communicated with each other
container can only communicated by Ip address,not by container name.
User define bridge network
.possible to achieve isolating containers.
.c1 and c2 can communicate to each other and host via bridge default
.c3 and c4 can't communicate to c1 and c2 but can communicate to host via bridge network.
.container can communicate by IP address ans also resolve a containerrrrrrrs name to an IP address
this capacity is called automatic service discovery.
commands related to docker network
docker network ls # list all network,bridge is default network
docker network inspect bridge # used to inspect bridge n/w to see what container are connected to it
docker network create --driver bridge network_name # to create user-define bridge n/w
docker network inspect network_name


docker run --name container_name -itd --network network_name alpine(image_name)
#it used to connect a container to a specific network eg:host,user-define_bridge e.t.c

docker network connect container_name network_name
#it is used to connect a running container to existing user_define bridge network


docker network disconnect container_name network_name
#to disconnect a running container to existing user-define bridge

docker network rm network_name # to delete
'
In this tutorial we will learn about the Docker.
make dev-down
git config pull.rebase false
docker exec -it e0f2fc6c493f /bin/bash
mysql -u root -p
sudo service mysql stop
docker stop 6357
docker run -d --name new_db_container -e MYSQL_ROOT_PASSWORD=rTsBaseRpES -p 3306:3306 mysql:latest
docker run -d --name hivelaya_db -e MYSQL_ROOT_PASSWORD=rTsBaseRpES -p 3306:3306 mysql:latest
docker inspect -f '{{.Config.Env}}' hivelaya_db
sudo -u postgres psql
sudo service postgresql start
sudo dmidecode -s system-product-name
make dev-down
See database setup with docker
1.open the pgadmin
2.create server , provide name
3.provide host name/address as locahost or you can det docker running ip address as ip address as see docker 0;
4.provide the port on which docker project's database is running like : 5430
5.provide username and password and connect to the database
you can access database as
sudo apt-get install postgresql-client
psql -h localhost -p 5430 -U your_username -d your_database
About author

Amrit Panta
Python developer, content writer
You may also like

3 Comments
Leave a Reply
Scroll to Top
Amanda Martines 5 days ago
Exercitation photo booth stumptown tote bag Banksy, elit small batch freegan sed. Craft beer elit seitan exercitation, photo booth et 8-bit kale chips proident chillwave deep v laborum. Aliquip veniam delectus, Marfa eiusmod Pinterest in do umami readymade swag. Selfies iPhone Kickstarter, drinking vinegar jean.
ReplyBaltej Singh 5 days ago
Drinking vinegar stumptown yr pop-up artisan sunt. Deep v cliche lomo biodiesel Neutra selfies. Shorts fixie consequat flexitarian four loko tempor duis single-origin coffee. Banksy, elit small.
ReplyMarie Johnson 5 days ago
Kickstarter seitan retro. Drinking vinegar stumptown yr pop-up artisan sunt. Deep v cliche lomo biodiesel Neutra selfies. Shorts fixie consequat flexitarian four loko tempor duis single-origin coffee. Banksy, elit small.
Reply